This is a topic near and dear to my heart. When I first started out, my CF supervisor observed that I was setting up my therapy with opportunity for drill and practice of each goal (even there she helped show me ways to maximize student practice and output). The step I was missing, however, was a methodical way to teach the skill. I started thinking about how to teach the steps to students so that they would truly understand the “what, why, how” of their therapy. This came pretty natural in articulation therapy, however it took more observing, learning, and experience on my part to develop this in language therapy. I noticed how a colleague was teaching her students “strategies” to apply in their classwork. I started reading, researching, and asking questions. Fourteen years later I still ask other therapists what kinds of language strategies they teach because I like learning new ideas. I think this is an area that we can continue to develop within our therapy sessions and I love to hear how other therapists implement language strategies. I have also learned so much from my colleagues in the general education classrooms. I’ve been inspired by their classroom anchor charts, reading instruction, and behavior management tools.
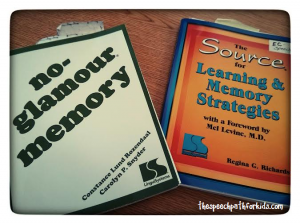
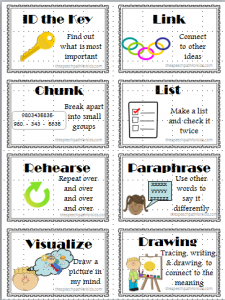
There are two resources from Linguisystems that I purchased several years ago relating specifically to memory strategies. The No-Glamour Memory book offers practice tasks to address multiple auditory and visual memory strategies. I like using their summary of strategies while sharing information with teachers and parents. The Source for Learning & Memory Strategies book is a fantastic learning resource. I have read and re-read this multiple times, each time pulling new information and ideas to apply to therapy. It has a nice combination of theory and practice. It explains the WHAT, WHY, and HOW along with providing examples specific to each curriculum area. When teaching language skills, I have found that I use these eight memory strategies the most: ID the Key, Rehearse, Link, Paraphrase, Chunk, Visualize, List, and Draw. (I include color coding, tracing, writing, drawing pictures into the “drawing” strategy) I make an effort to incorporate the vocabulary and concepts of these memory strategies into every activity and lesson. The repetition makes a difference!
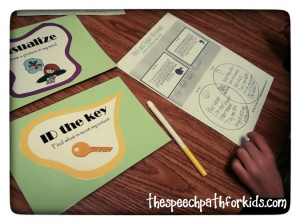
Sometimes it is in my lesson plans, such as when we practiced “visualization” and “ID the Key” with a comparing/contrasting lesson. (You can read more about that lesson here.) I knew ahead of time that we would utilize these memory strategies with this language lesson. We started off by talking about these strategies and then the students retrieved the picture cues from the board. (I made a set magnetic to go on my board.) I modeled the vocabulary of the strategy several times and also gave them opportunities to rehearse it. We talked about the WHAT, HOW, and WHY through the whole lesson.
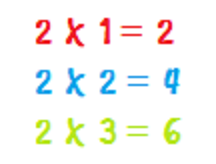
Other times, however, a lesson happens spontaneously. Recently, one of my third graders came to my class and his teacher mentioned he was having a lot of difficulty with passing his 2s times table. I dropped my lesson I had prepared for that day and instead jumped right on board with what was important to his immediate classroom success. This wasn’t just about passing a level of multiplication. This was my opportunity to teach him a strategy (or several!) that would enable him to learn HOW to learn. I stressed to him that this wasn’t about memorizing his facts, but he was learning how to remember and he could apply that to many more levels of math. We used rehearsal, color coding, and drawing to make flashcards. We clapped the facts, drew them on the board, colored them on flashcards, traced them large, chanted them, used loud and soft voices. I was determined to use every single pathway in his brain to learn, remember, and recall this information!
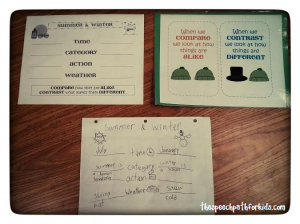
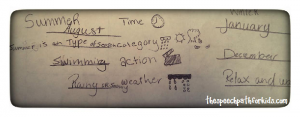
This week I was working on describing, comparing, and contrasting with my 5th graders. The students in this group have a combination of language, pragmatic, and significant articulation goals. (It makes for interesting planning but somehow we make it all work!) I had to teach a specific articulation strategy to one of the children. In order to do that, I got the other three started on the describing activity. We have used this kind of template before when describing other items (top left in the picture above). Usually I give them their own paper to fill out and I provide a lot of prompting. This time though, I only had one copy left so it went in the middle of the table. They were told to use it as their guide, make their own template and fill it out. I was amazed when I walked back over and they had all copied the template and were independently completing it. This is a huge step for these kiddos! (It also made me reflect on how much kids can accomplish when expectations are high!) Some of their content was off a little bit…don’t worry, we did talk through the corrections 🙂
This group historically has a very hard time being able to define “category”, “action”, “location”, etc. I was tickled when I saw the visuals that one student drew to help him remember each descriptive characteristic. Do you see what symbol he used for “action”? I love it! We haven’t practiced “drawing” with this template before and he completely initiated that himself. That, my friends, is the POWER of teaching memory strategies!
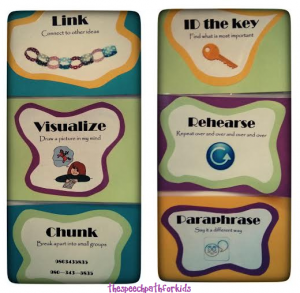
Several years ago I made some visual cues to help students learn and apply memory strategies. I just grabbed images while searching on Google and backed with colorful paper. I have magnets on them and they are on my board, always visible and accessible to my students. They have the name of the strategy, a student friendly definition, and a visual cue. I use them all the time, but when Andrea asked about them on a previous post, I couldn’t find my original file. They were due for an update anyways, so I put together a new set (with the same content). There are three versions: half page, quarter page, and all eight to a page. I like having them all on one page when sending home or including in their journals, but the larger sizes are nice for teaching. When I am pushing in to classes, I slip the full page into a sturdy page protector and have them all available to reference.
You can download the set of visuals in my TPT store (it’s a freebie!). I made it printer friendly, thinking you could print onto color paper that matches the color scheme in your therapy room. I would love to hear how you incorporate memory strategies into your therapy sessions. What visual cues or learning techniques do you teach your students?



Thank you SO much!! I have some kiddos that are struggling and I know it’s due to memory (or lack thereof) 🙂
You’re welcome! Thanks for taking the time to check it out. I’m glad it will be helpful for you 🙂
Thanks you so much for sharing the visual cues for memory and your experiences with teaching these strategies. I know they’ll be useful!
I use a lot of pacing boards as a visual support – even drawing some circles on a piece of paper on the spot helps students remember to make longer sentences. I’ve also used bingo chips with reluctant talkers – they get a chip for every word in their sentence and then we look at their “pile” at the end… They tend to like that.
Oh I like the idea of filling in circles with the bingo chips! I do something similar with unifix cubes, but the kids would love the change of pace to use the chips! Thanks for sharing!
Pingback: Teaching with chapter books in speech therapy |
Excellent visuals! I’m using these now with 6th graders.